 |  |  | Operating the Readout Control Panel |  |
Operating the Readout Control Panel
This section describes the Readout Control Panel. You will learn:
- How to start the Readout Control Panel
- How to set the run title and run number.
- How to initiate a run.
- How to indicate a run is a production run.
- How to initiate a timed run.
The figure below shows the Readout control panel.
The Readout control panel
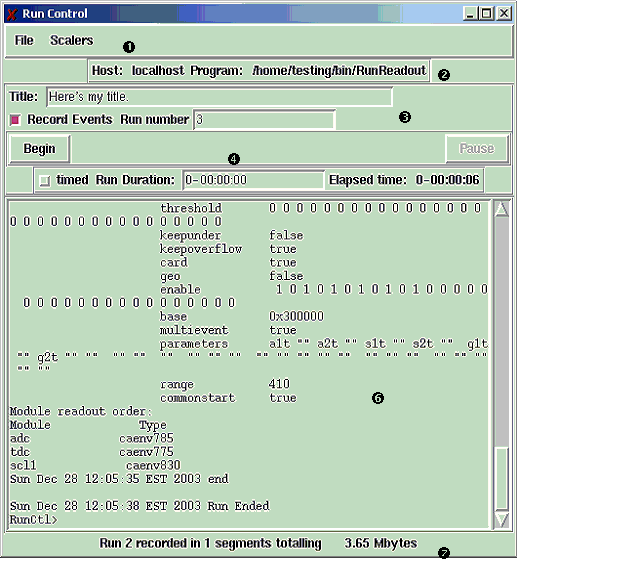
Refer to the numbers in the figure in the discussion below.
- The top strip of the control panel includes a menu bar. The File menu allows you to start and stop the readout program, exit the GUI, and select a new readout program. Note that the RPI data acquisition system uses a unique scriptable readout program and therefore you will never need to select a new readout program. The Scaler menu allows you to select readout parameters for the periodic scalers, such as the interval between periodic scaler readout.
- This stripe documents the readout program that is actually run. The RPI readout system actually runs a script that in turn runs the Readout program passing appropriate command line parameters to the real Readout program. This script is set-up for you when you create data acquisition accounts. For more information about account setup, see the System installation and management guide.
- This segment of the user interface allows you to document the run conditions. This section of the interface is disabled while runs are in progress. In this section you can:
- Set an identifying run title.
- Set a run number. Note that if runs are being recorded to disk, the number you set will be automatically incremented at the end of each run.
- Determine whether or not the run is being recorded to disk. Note that when runs are being recorded, the control panel background turns green to indicate this.
- This strip contains the actual run controls. The Begin button initiates a data taking run with the current set of conditions. Once the run has started, this button becomes an End button and is used to end a run. The Pause button is enabled when data acquisition is in progress and allows you to suspend a run. When the run is suspended, the Pause button becomes a Resume button. Suspended runs can be Resumed by clicking the Resume button or they can be ended without any additional data taking by clicking the End button.
- This strip allows you to set the parameters of a timed run. The controls in this strip are disabled when data taking is in progress. By checking the timed run box and entering a time in the Run Duration text entry prior to starting a run you indicate you want a fixed length run. Note that regardless, the Elapsed time field of this strip indicates how long a run has been active (Elapsed time does not count during a pause).
- All output and error messages from the Readout program are captured in this scrolling window. Note that if you have an error in your Readout configuration script this will be indicated here along with recommended corrective action.
- This status strip indicates how much data has been taken to disk for the active run. It updates periodically while a run is in progress. Note that the EventLog program understands how to segment runs into files that are less than 2Gbytes long (a Linux file size limit), and that the ReadoutGui knows how to handle runs that have been segmented in this way.
Report documentation errors to
Ron Fox
(fox@nscl.msu.edu)or
NSCL's Bugzilla page
| | | Operating the Readout Control Panel | |