Chapter 3. Testing and Running the Software.
Now let's put all the pieces together and test the system end-to-end. We will:
Start SpecTcl
Reload our spectrum and window definition files into SpecTcl
Connect SpecTcl to the online system so that it will analyze data taken from our Readout program.
Start the Readout Program
Start a run in Readout
Check that we see counts in our spectra in SpecTcl
First lets start SpecTcl and recover the definitions we made earlier. With your working directory set ˜/experiment/spectcl, start SpecTcl by typing: ./SpecTcl
Once all of the SpecTcl windows pop up, reload the spectrum configuration using: -> on the GUI window. Next load the window definition file for Xamine by clicking: ->. You should now have an array of spectra in the Xamine window, four rows, by eight columns, as before.
Now lets hook SpecTcl to the online system. SpecTcl has a concept of data sources. A data source is a source of event data that SpecTcl can histogram. The menu on the SpecTcl Gui provides a selection of data source types. Click the -> menu item on the Gui window. This will bring up the dialog shown in the following figure.
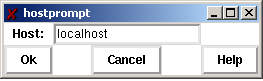
The NSCL Data acquisition system is a distributed system. It is therefore possible to histogram data on a system other than the one the Readout runs on. In most real experiments at the NSCL, we do exactly that. In this case, we will run SpecTcl and the readout program on the same system. Therefore the default host localhost is correct. Simply click the button to connect to the online system.
Now we must start Readout and begin a run so there is data for SpecTcl to analyze. With our current working directory set to cd ~/experiment/readout, start the readout program: ./Readout. When you get the prompt, type: begin.
The status line at the bottom of the SpecTcl GUI should reflect the number of buffers SpecTcl has analyzed and the analysis efficiency. SpecTcl is not allowed to dictate the data rate. Therefore it only analyzes the fraction of the data it is able to keep up with. The efficiency reflects that percentage. When analyzing data from offline sources (e.g. event files), all data are analyzed, so the efficiency is 100%.
In the Xamine window, click the button in the second box of buttons. The histogram for the channel into which you have put the pulser should show a sharp peak. If you double click this spectrum to zoom in, you should see something like this:
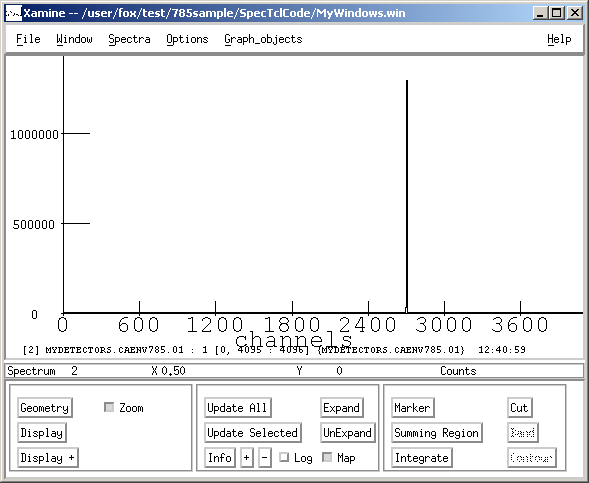
By adjusting the pulse height you should be able to move this peak across the spectrum. By switching input channels you should be able to produce this peak in any of the histograms.